You may already know that DSLRs and lenses like most products have manufacture tolerances. If the camera or lens focuses, say within +/- 3 then it may be acceptable for the manufacturer. But if your camera is +3 and your lens is also +3 then you may have focus issues. The most common cause for front or back focus is because of this.
Focusing accuracy is the second most important factor in image sharpness (after blur due to camera shake). So if your lens looks to be not sharp enough this is worth a try to rectify your problem.
If you own one of the newest cameras from Nikon or Canon (I am not sure about other manufacturers) then you should have this feature. In Nikon this feature is available in D300, Nikon D700, Nikon D3 and Nikon D3x. In canon this feature is available in Canon 50d, Canon 5d mark II and also in 1 DS & 1D mark III.
(For in depth explanation of various Auto focus settings and custom modes in auto focus for users of Nikon D700 D3 and D300 please see http://prakashphotography.blogspot.com/2008/12/nikon-d700d3d300-autofocus-settings.html)
(For in depth explanation of various Auto focus settings and custom modes in auto focus for users of Nikon D700 D3 and D300 please see http://prakashphotography.blogspot.com/2008/12/nikon-d700d3d300-autofocus-settings.html)
I have used this feature in both Canon and Nikon and I will go through this set up process.
AF MICROADJUSTMENT:
For this you need the test image which you need to download (links below) and use LIVE View feature in your camera. The adjustment process uses Moire interference patterns produced by these images when they are in focus.
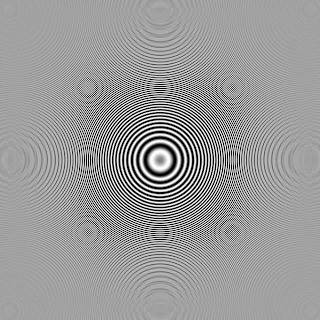
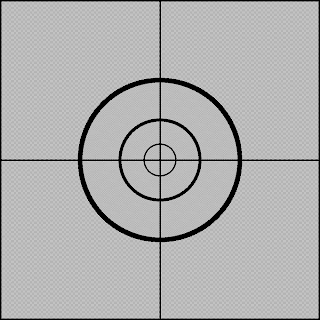


You need to put your camera on your tripod. You need to have the image on your computer screen (Please don't print !!!). If possible use a monitor, instead of laptop screen. Use Live View to manually focus. Do it slowly and carefully and a patience helps a lot in getting your focus accurate and also use less tries to get it set up.
Here are the steps:
(Please note these steps best work for f/2.8 or faster lens. If you use f/2 or faster primes this method may or may not work, please see below another method for these fast lenses)
1. Bring the Test image on your screen. Make sure it is at 100% size on your screen.
2. Place your camera secure on a tripod. Level it by viewing the center of the image on the screen (do not bother about focus now). Turn off VR, IS features if your lens has one. Make sure the camera lens and monitor screen are parallel.
3. Place the tripod so that the lens is beyond the minimal focus distance at its longest focal length (if it is a zoom, ex. for 24-70mm use minimal focal distance at 70mm). If your lens can focus to 1 meter then set the tripod at 1.2 to 1.5 meters.
4. First turn on Live view. Use Aperture priority mode and use maximum aperture for the lens (as wide open as possible). Set your lens to manual focus.
5. Use Live view screen to manually focus your lens till you see the most significant Moire pattern on the Live view.
6. Now without moving your camera or lens set your lens to Autofocus. Set your camera to single shot AF. Manually select center AF point for focusing. Next half press the shutter while you watch the focus distance scale of your lens.
7. If your lens focus distance scale did not move then your lens does not need any AF microadjustment. Go back to live view and make sure the moire pattern has not changed. Repeat this process if needed to make sure.
8. If your lens focus scales did move then you need to make AF Microadjustments. Go to Set UP menu in Nikon to access AF fine tune or Custom Fn. III in Canon to access AF microadjustment (set to adjust by lens). Now if the distance scale moved clockwise dial in (-) or if it moved anticlockwise dial in (+). Dial in 5 or 10 depending upon the movement. If you make a mistake and dial in + instead of - your focus will be way off so you should be able to recognise this. Keep changing the AF adjustment till the focus scale does not move. Once you are done do not forget to save this setting for this lens. You have to press the info button in Canon and the OK button in Nikon otherwise none of your settings will be saved.
That's it you are set for this lens.
That's it you are set for this lens.
Well his method works for zooms whose widest aperture is f/4 or smaller. But for primes f/2 and larger, I did not found this method to be efficient. These fast lenses have razor thin DOF and the above method is not very accurate. So I created my own way of adjusting AF fine tune. Please give it a try you may find it very accurate.
You can always get the commercial available tool for this at www.rawworkflow.com/lensalign but if you want to save $140 you can try my method.
Basically I use a remote. You can use any remote that has numbers. It is readily available and no one should have problems finding several in your homes.
Now I think this is a very good method. This method is copyrighted by me and me alone and you can try it free but if you post it elsewhere my international copyright attorney is watching every website in this planet and you will be found and brought to justice. If it does not work the fine print says I am not liable. Beware of my legal entourage. Okay just kidding. Here goes my innovative method.
I selected a remote and not a ruler because in a remote each number has its own button which is 3 dimensional and so your accuracy will be very high.
1. Place the remote on a flat surface or better at 45 degrees.
2. Place your camera and lens on a tripod at a distance just beyond the near focusing distance (with the lens at maximum zoom if it is a zoom).
3. Focus on any number in the middle of the remote. Make sure there are numbers below and above this.
4. With your lens wide open and your camera set to single point AF take pictures. Examine the photos at 100% and check for AF accuracy.
5. If your photo shows that the focus is exactly on the number you tried to focus and if the numbers in front and behind are blurred then your lens does not need any AF microadjustment.
6. If your photo shows that the number behind the one that you tried to focus is sharp then dial in + adjustment. If the number in front is focused then dial in - adjustment. Keep repeating this till you get your number in sharp focus. Once you get a sharp focus save this AF microadjustment. You are done.
The only suggestion is to improve accuracy and ease is try to find a remote where the number spacing is such that you get only one row of numbers in focus with the front and back rows blurred. This should be very easy if you have 2 0r 3 remotes in your home.
As usual your comments are greatly appreciated.


Hello, I need help. It's not clear between step 5 and 6. You have two images. Image2.gif has moire pattern but the center is fuzzy. Not very good for auto focus, I think. Image2.gif is a perfect target for auto focus. Should I be using just Image2.gif alone for both live view focus to most moire pattern then auto on this same image? Or I need to switch to Image1.gif go do auto focus?
ReplyDeleteok...so what happens when no matter what you're adjustment is, the sucker always is off focus...always behind the focus point irrelevant of adjustments made
ReplyDeleteThen your lens is way off and needs to be sent to the manufacturer for calibration.
ReplyDeleteIt should be noted that AF micro adjustment is for PRIME lenses only. doing it for zoom lenses is utterly pointless as you cannot be sure your adjustment at, say, 24mm is not going to throw focus out at 70mm.
ReplyDeleteThanks. I think that your tip about using a picture of a remote is one of the best. Easy and cheap. I've used it with my 5D Mkii
ReplyDeleteEdwin, The Netherlands