Wish you all a happy new year.
In the next few weeks, I am going to be updating this blog with new articles in the following topics. Please check back frequently. I will be traveling in the next 2 weeks and I intend to update the blog in the second weekend of January.
AF microadjustment - Indepth guide.
http://prakashphotography.blogspot.com/2009/01/autofocus-microadjustment.html
Lens sharpness and Lens characteristics.
Nikon 24-85mm f/2.8-4 Review.
http://prakashphotography.blogspot.com/2009/02/nikon-24-85mm-f28-4-ed-if-lens-review.html
Nikon 70-300 VR Review.
http://prakashphotography.blogspot.com/2009/02/nikon-70-300mm-af-s-vr-review.html
Special - The finest Nikkor ever made.
Zeiss 25mm. f/2.8 Review.
Zeiss 35mm f/2 review.
Zeiss 50mm f/1.4 Review.
http://prakashphotography.blogspot.com/2009/03/zeiss-50mm-f14-review.html
Prakash
Tuesday, December 30, 2008
Thursday, December 25, 2008
Nikon D700/D3/D300 Autofocus settings
Nikon's latest Multicam 3500 (FX module for full frame cameras) is the most advanced AF modules ever implemented in a Nikon. It has 51 AF points that includes 15 cross type sensors. It also has 3D tracking which uses color contrast for additional tracking accuracy. Nikon should be appreciated for giving the same module for all three cameras. I have been using the D700 and I am extremely impressed with the speed and accuracy of auto focus. (Check out on my best walk around lens for Nikon D700). I wanted to share some of my experiences with Nikon users. To get the most out this complex auto focus system the custom settings must be tweaked to different situations. This gives users a wide range of control and optimizes the AF accuracy.
1. AF Modes:
This control is on the front side of the camera.
There are 2 AF modes, S (single servo) & C (continuous servo). The third mode is M (Manual focus).
Select either S or C for Auto focus.
In the single servo mode, the AF tracks a subject till it achieves focus. It the locks (you get a green signal in the view finder) the focus as soon as focus is achieved, meaning the plane of focus is locked. This can be used for subjects moving in one plane example from left to right and you only need one frame in sharp focus or for subjects who move and come to a stop. I rarely use this mode.
2. Continuous servo mode:
This is the most import mode for tracking moving subjects. I would set the AF mode to C for the most part. This uses "predictive focus". It does not lock one focus plane but continuously changes the focus plane with the movement of the subject. Example a dog running towards you. It continuously focuses as the dog moves towards you. When you press the shutter there is a very brief delay when the mirror moves up and then the shutter opens. The AF system predicts where the subject will be taking into account the slight delay (in millisec) in image capture after the shutter is pressed. So the camera continuously tracks and also predicts where the subject is going to be when the image is captured. This method is "predictive tracking". You can use this mode for single or multiple shots (multiple frames/sec). I recommend using this mode for taking pictures of anything that moves.
AF area Modes:
At the back of the camera you can see this setting. This basically determines how many focus points will be used for auto focus. The choices are Single point AF, Dynamic area and Auto area AF.
3. Custom settings for AF:
This can be accessed through the menu options, scrolling to custom settings and selecting Auto focus settings.
These are the basic three parameters that you change for your AF needs.
Now lets make some selections for these settings. I like to keep things simple, so I don't have to change settings very frequently.
1. AF mode.
Unless I do manual focus I always leave it at C for continuous tracking.
2. AF area mode.
If you want automatic control of AF then choose Auto. The camera does everything including identifying the subject, selecting the focus point and achieving focus. Since "you" want to be in control of what you capture, I recommend that you skip this mode.
That leaves us 2 options.
Single point AF: If you are shooting anything static, select this mode. Also try to select the center point if your composition allows since this provides the fastest AF. Use this setting for all Landscapes, Nature (still), studio portraits, product photography etc. if you need auto focus and you are set. You only need to change the AF point using the selection dial if needed. Otherwise you do not need to change any other setting for the most part.
Dynamic area AF:
If you are going to track any moving subject, this the setting you want to be in. You also need to select 9 or 21 or 51 points AF. Though selecting 51 points sounds good on paper this slows down the AF. How do we then select the appropriate points. The key is to understand that at least one point should be on the subject to maintain focus. Consider a car moving rapidly, you do not need 21 0r 51 points to keep it in focus. You can do it with 9 points and keep following the car with the 9 focus points. Now change the scenario to a smaller subject like a dog running, you will find it difficult to keep focus with only 9 points. In this situation 21 points is the better option. Now consider a situation where the subject is smaller but moves erratically within the frame, think a kid playing, now 51 points with 3D tracking is a better option.

Custom Settings: These are settings that you do not need to change frequently once you set them up according to your liking.
a1: AF-C priority selection:
3 choices available, Release (default), Release + Focus and Focus only. Change this from the default release mode to Focus mode. You want the camera to focus before the shutter opens. That is what the focus mode does for you. The default release mode takes the picture no matter whether the camera achieves focus or not. You will get a lot of OOF shots with the default mode.
(Please note choosing the focus mode may slow down the frame rate but your in focus shots will be very high).
a2: AF-S Priority selection: Same as last but for single servo mode. Select focus priority.
a3: Dynamic area:
This is for 9 point, 21 point or 51 point selection
Please see above (discussed already) for your options.
a4: Focus tracking with Lock on:
A very important parameter that rarely gets the attention, so very frequent source of too slow AF complaints.
There are 4 options in the camera : Long, normal (default), short and off. This option controls the amount of time the camera waits before refocusing if the subject is out of focus.
Say you are taking pictures of Soccer. If you are tracking the player but somebody comes in between you and the player then this option prevents focus to shift away from the player to the interfering subject in between. So if you are shooting soccer, football, or something similar where the action is across the frame and the distance between the subject and the camera will not change rapidly then choose either long or normal.
But for all other purposes where there is very little between you and the subject this setting will cause a delay in acquiring focus. So set this to OFF. (Remember default is normal so change this to OFF)
I usually have this OFF unless I know for sure that somebody is going to interfere between me and the subject. You can leave this OFF for the most part.
a5: AF activation:
This option decides how you auto focus. You can do it by half press shutter button as well as AF-ON button. I recommend changing this setting to AF-ON only. IF you do this you have to remember that half press shutter does not do anything to auto focus and you might take time getting used to this. But this setting (using only AF-ON to auto focus) will definitely improve the speed of auto focus. Try this and see if you like it.
SHOOTING multiple FPS (ACTION)
If you are shooting multiple frames/sec. then you have to use AF ON to focus as this results in your camera continuously tracking and predicting the subjects movement and position and increases the focus accuracy in a series of shots. If you half press the shutter button for focusing then the first shot will be in focus but then the camera stops focusing till you half press again so if you do this you will only have a very few or atmost one shot in focus.
a6: AF point illumination.
I found that the default Auto mode works best for 99% of situations. If you constantly want to see the active focus point you can choose ON. But this interferes with the composition and I leave it at Auto where it illuminates just a second and disappears.
a7: Focus point wrap around:
This is not going to affect AF in any way (other than your convenience), just leave it at default (no wrap).
a8: AF point selection:
I would leave it at default. This is for manual focus point selection. If you use manual selection of focus points a lot then I would change to 11 points if the subject is large and occupies a large portion of the frame. For very small subjects I would choose 51 points.
a9: AF assist Illuminator:
This does not make much of a difference. If you are OK to illuminate your subject before taking the picture, then you can turn it ON but beware it is not a pleasant situation for portraits to have the AF light illuminated on their eyes and it takes away opportunities for candids. On the plus side it significantly increase AF speed and accuracy in low light
(For in depth explanation, understanding of settings and a user guide to AF Microadjustment please see http://prakashphotography.blogspot.com/2009/01/autofocus-microadjustment.html)
That's it you are set. Now lets see some examples situations:
For all these situations set the AF mode as continuous servo mode ("C" setting in front side of your camera) and Dynamic area mode ( setting at the back of the camera).
I am just going to look at important settings that needs to be changed. The rest do not make a big difference.
1. Horse racing, Track a race car/bike or Sports photography like athletics:
a1: AF-C priority selection: Set to Focus.
a3: Dynamic area: Set to 9 Points.
a4: Focus tracking with Lock-on: Set to OFF.
a5: AF activation: Set to AF-ON only (Remember and get used to press AF-ON to focus).
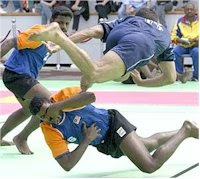
2. Kids playing/jumping, Sports like Tennis where the movement is very unpredictable, Stage shows (3D tracking is very accurate to human skin color), Small birds that are quick and unpredictable in flight:
a1: AF-C priority selection: Set to Focus.
a3: Dynamic area: Set to 51 Points with 3D tracking.
a4: Focus tracking with Lock-on: Set to OFF.
a5: AF activation: Set to AF-ON only (Remember and get used to press AF-ON to focus).
3. Soccer/Football where action is across the frame, Small subjects like a small dog running or Bird in flight:
a1: AF-C priority selection: Set to Focus.
a3: Dynamic area: Set to 21 Points.
a4: Focus tracking with Lock-on: Set to normal or long. (if the action is closer to you choose normal if it is very far choose long)
a5: AF activation: Set to AF-ON only (Remember and get used to press AF-ON to focus).
There you go, now do a little bit of practice, choose your settings. If you want use custom bank for different situations and then you are good go shoot action.
Check my impression on the Nikon 70-300mm VR AF-S here
If you feel you have some additional tips feel free to add it in the comments section. Thanks.
1. AF Modes:
This control is on the front side of the camera.
There are 2 AF modes, S (single servo) & C (continuous servo). The third mode is M (Manual focus).
Select either S or C for Auto focus.
In the single servo mode, the AF tracks a subject till it achieves focus. It the locks (you get a green signal in the view finder) the focus as soon as focus is achieved, meaning the plane of focus is locked. This can be used for subjects moving in one plane example from left to right and you only need one frame in sharp focus or for subjects who move and come to a stop. I rarely use this mode.
2. Continuous servo mode:
This is the most import mode for tracking moving subjects. I would set the AF mode to C for the most part. This uses "predictive focus". It does not lock one focus plane but continuously changes the focus plane with the movement of the subject. Example a dog running towards you. It continuously focuses as the dog moves towards you. When you press the shutter there is a very brief delay when the mirror moves up and then the shutter opens. The AF system predicts where the subject will be taking into account the slight delay (in millisec) in image capture after the shutter is pressed. So the camera continuously tracks and also predicts where the subject is going to be when the image is captured. This method is "predictive tracking". You can use this mode for single or multiple shots (multiple frames/sec). I recommend using this mode for taking pictures of anything that moves.
AF area Modes:
At the back of the camera you can see this setting. This basically determines how many focus points will be used for auto focus. The choices are Single point AF, Dynamic area and Auto area AF.
3. Custom settings for AF:
This can be accessed through the menu options, scrolling to custom settings and selecting Auto focus settings.
These are the basic three parameters that you change for your AF needs.
Now lets make some selections for these settings. I like to keep things simple, so I don't have to change settings very frequently.
1. AF mode.
Unless I do manual focus I always leave it at C for continuous tracking.
2. AF area mode.
If you want automatic control of AF then choose Auto. The camera does everything including identifying the subject, selecting the focus point and achieving focus. Since "you" want to be in control of what you capture, I recommend that you skip this mode.
That leaves us 2 options.
Single point AF: If you are shooting anything static, select this mode. Also try to select the center point if your composition allows since this provides the fastest AF. Use this setting for all Landscapes, Nature (still), studio portraits, product photography etc. if you need auto focus and you are set. You only need to change the AF point using the selection dial if needed. Otherwise you do not need to change any other setting for the most part.

Dynamic area AF:
If you are going to track any moving subject, this the setting you want to be in. You also need to select 9 or 21 or 51 points AF. Though selecting 51 points sounds good on paper this slows down the AF. How do we then select the appropriate points. The key is to understand that at least one point should be on the subject to maintain focus. Consider a car moving rapidly, you do not need 21 0r 51 points to keep it in focus. You can do it with 9 points and keep following the car with the 9 focus points. Now change the scenario to a smaller subject like a dog running, you will find it difficult to keep focus with only 9 points. In this situation 21 points is the better option. Now consider a situation where the subject is smaller but moves erratically within the frame, think a kid playing, now 51 points with 3D tracking is a better option.

Custom Settings: These are settings that you do not need to change frequently once you set them up according to your liking.
a1: AF-C priority selection:
3 choices available, Release (default), Release + Focus and Focus only. Change this from the default release mode to Focus mode. You want the camera to focus before the shutter opens. That is what the focus mode does for you. The default release mode takes the picture no matter whether the camera achieves focus or not. You will get a lot of OOF shots with the default mode.
(Please note choosing the focus mode may slow down the frame rate but your in focus shots will be very high).
a2: AF-S Priority selection: Same as last but for single servo mode. Select focus priority.
a3: Dynamic area:
This is for 9 point, 21 point or 51 point selection
Please see above (discussed already) for your options.
a4: Focus tracking with Lock on:
A very important parameter that rarely gets the attention, so very frequent source of too slow AF complaints.
There are 4 options in the camera : Long, normal (default), short and off. This option controls the amount of time the camera waits before refocusing if the subject is out of focus.
Say you are taking pictures of Soccer. If you are tracking the player but somebody comes in between you and the player then this option prevents focus to shift away from the player to the interfering subject in between. So if you are shooting soccer, football, or something similar where the action is across the frame and the distance between the subject and the camera will not change rapidly then choose either long or normal.
But for all other purposes where there is very little between you and the subject this setting will cause a delay in acquiring focus. So set this to OFF. (Remember default is normal so change this to OFF)
I usually have this OFF unless I know for sure that somebody is going to interfere between me and the subject. You can leave this OFF for the most part.
a5: AF activation:
This option decides how you auto focus. You can do it by half press shutter button as well as AF-ON button. I recommend changing this setting to AF-ON only. IF you do this you have to remember that half press shutter does not do anything to auto focus and you might take time getting used to this. But this setting (using only AF-ON to auto focus) will definitely improve the speed of auto focus. Try this and see if you like it.
SHOOTING multiple FPS (ACTION)
If you are shooting multiple frames/sec. then you have to use AF ON to focus as this results in your camera continuously tracking and predicting the subjects movement and position and increases the focus accuracy in a series of shots. If you half press the shutter button for focusing then the first shot will be in focus but then the camera stops focusing till you half press again so if you do this you will only have a very few or atmost one shot in focus.
a6: AF point illumination.
I found that the default Auto mode works best for 99% of situations. If you constantly want to see the active focus point you can choose ON. But this interferes with the composition and I leave it at Auto where it illuminates just a second and disappears.
a7: Focus point wrap around:
This is not going to affect AF in any way (other than your convenience), just leave it at default (no wrap).
a8: AF point selection:
I would leave it at default. This is for manual focus point selection. If you use manual selection of focus points a lot then I would change to 11 points if the subject is large and occupies a large portion of the frame. For very small subjects I would choose 51 points.
a9: AF assist Illuminator:
This does not make much of a difference. If you are OK to illuminate your subject before taking the picture, then you can turn it ON but beware it is not a pleasant situation for portraits to have the AF light illuminated on their eyes and it takes away opportunities for candids. On the plus side it significantly increase AF speed and accuracy in low light
(For in depth explanation, understanding of settings and a user guide to AF Microadjustment please see http://prakashphotography.blogspot.com/2009/01/autofocus-microadjustment.html)
That's it you are set. Now lets see some examples situations:
For all these situations set the AF mode as continuous servo mode ("C" setting in front side of your camera) and Dynamic area mode ( setting at the back of the camera).
I am just going to look at important settings that needs to be changed. The rest do not make a big difference.
1. Horse racing, Track a race car/bike or Sports photography like athletics:
a1: AF-C priority selection: Set to Focus.
a3: Dynamic area: Set to 9 Points.
a4: Focus tracking with Lock-on: Set to OFF.
a5: AF activation: Set to AF-ON only (Remember and get used to press AF-ON to focus).
2. Kids playing/jumping, Sports like Tennis where the movement is very unpredictable, Stage shows (3D tracking is very accurate to human skin color), Small birds that are quick and unpredictable in flight:
a1: AF-C priority selection: Set to Focus.
a3: Dynamic area: Set to 51 Points with 3D tracking.
a4: Focus tracking with Lock-on: Set to OFF.
a5: AF activation: Set to AF-ON only (Remember and get used to press AF-ON to focus).
3. Soccer/Football where action is across the frame, Small subjects like a small dog running or Bird in flight:
a1: AF-C priority selection: Set to Focus.
a3: Dynamic area: Set to 21 Points.
a4: Focus tracking with Lock-on: Set to normal or long. (if the action is closer to you choose normal if it is very far choose long)
a5: AF activation: Set to AF-ON only (Remember and get used to press AF-ON to focus).

There you go, now do a little bit of practice, choose your settings. If you want use custom bank for different situations and then you are good go shoot action.
Check my impression on the Nikon 70-300mm VR AF-S here
If you feel you have some additional tips feel free to add it in the comments section. Thanks.
Friday, December 19, 2008
Are RAW images really RAW
I have seen that a lot of arguments in various forum regarding RAW images from Nikon and Canon especially concerning Noise Reduction(NR). There are accusations that the other brand plays unfair because they change the raw data where NR is applied to the RAW image.
This argument occurs because most of them are not aware how the image is acquired. I will attempt to describe how an image is acquired by a camera in as simple manner as possible but this is a crude way to describe and not essentially scientific.
Today CMOS (Complementary metal–oxide–semiconductor) sensors work in the basic principle that when light falls on the sensor pixel unit, the energy from the light is converted to voltage. The transistor attached to the sensor pixel units amplify this signal. The sensor has a Bayer Filter which is a color filter. The filter allows only light from one color, red, blue or green. Usually green is represented twice that of blue and red. So the sensor captures only 50% of incident green light, 25% incident red and 25% incident blue light. This signal is converted to voltage, amplified and demosaiced into an image. This demosaicing is the process that happens in all cameras and the image is formed after demosaicing. This is both hardware and software process. The resultant signal is the RAW image. Thus there has to be some processing prior to getting a RAW image. The way different colours are rendered, shadow/highlight detail captured, signal to noise ratio are all affected by this hardware/software processing. All these happen at the level of the Sensor Complex. There is no way to obtain an image without this process. You will have only electric signal otherwise.
This RAW image can further be processed to JPEG or TIFF or any other format. To accurately state the RAW image is not unprocessed but less processed.
Why is it then possible to adjust varying image parameters like exposure, brightness, color, contrast etc better in a RAW image to a JPEG/TIFF image? The answer is in the fact that the Gamma or the luminance intensity of the RAW file is wider than JPEG. Let me explain. The image data is represented as light levels. In a 12 bit raw image there is approx. 4000 light levels whereas the 14 bit has approx. 16000 light levels. The JPEG has 256 light levels (8 Bit). So this huge information is available for manipulation.
So what does RAW have?
More Information so less posterization.
White balance is not yet encoded so this can be altered in a wide range,
Color coding from bayer filter can be done by the RAW converter ( like lightroom, aperture etc) which can be more powerful and your visual input provides more accurate adjustment of colors.
These are the reasons why RAW images are superior for manipulation purposes ( please note I said superior specifically if manipulation is important for the photographer).
Good but I never discussed Noise Reduction (NR) in this entire process. In fact if you have noticed NR by a RAW converter is usually inferior to the NR done by specialised software (like noise ninja).
To understand this we need to identify how noise is introduced in an image. In the image processing chain noise is introduced at the point where the electrical signal from each pixel unit is amplified by the transister. This is actually a very tiny signal (voltage) that needs to significantly amplified to obtain meaning information. Unless this stage of amplification is completely eliminated from the image processing chain there is always going to be noise. But rather than noise the most important parameter is Signal to Noise Ratio (SNR). This is least discussed by many photographers. In low light, (high ISO images) the amplification is more so noise is more than signal thats why the image is degraded.
So in camera NR occurs at 3 levels.
1. At the sensor pixel level, depends on sensitivityof the sensor pixel unit to light. The more sensitive the pixel unit, the less amplification of signal needed and less noise (more SNR) is present in the image.
2. At the demosiacing level where the electric signal from sensor complex (sensor pixel unit and transistor) is covnverted to image signal.
3. At the RAW conversion level ( where Jpegs are created in camera).
We cannot control the first two levels. This is determined by the manufacturer of the sensor in level 1 and camera manufacturer in level 2. ( This is the reason for different noise levels in different camera maufacturers, though the sensor might be the same).
We can manipulate the last level. Since SNR is more dependent on the semsor complex, RAW NR does not offer as significant advantage as compared to other forms of image manipulation.
If you were able to follow me you will realise why RAW images from different manufacturers appear to have different levels of noise reduction. If the manufacturer feels that their cameras have more resolution they can afford to be more aggressive with NR since ultimately all that matters is Signal to Noise Ratio (SNR) as this is what we finally see. unfortunately this is least discussed parameter. More on SNR in future blogs ....
Sunday, December 14, 2008
Nikon D700 Vs Canon 5D mark II (MK 2)
I have been using the canon DSLRs for several years. I was using a canon 40D until recently which broke (due to my mistake) and is not functioning any more. So I was in the market for a new camera. I got a great deal on Nikon D700 with 24-85 f/2.8-4 and 70-300mm VR lenses as well as MB-D10 grip and I could not pass it so I bought it. I had not preordered the canon 5D mark II since I did not need it at that time and I was not sure I could get one any time soon.
I was at my local dealer to pick up an extra footplate for my tripod during thanksgiving weekend and I saw the new canon 5D mark II. I bought it on a whim considering even in a worse case scenario i could sell it for a profit if i did not like it. Now I had the option of returning either one since I was within the 2 week period. My plan was to keep one and return the other after identifying which one suited me better for my purposes. I dabble a bit in nature, birds, portrait, kids and events.
I was a bit hesitant about this blog considering how sensitive this comparison might be. There are a lot of people who consider that their buying decisions are challenged, if any deficiencies about their favorite brand is mentioned. They are going to find fault with the testing methods and attack the person behind the comparison. So I decided not to show any comparison images but to give my impressions with regard to my specific needs. (I intend to share some random images not comparison later). If your needs are exactly the same it is good, if not, there is nothing wrong with your choice of camera. With that out of the way I am going to give my impressions, the decision I made (Though I can easily afford both I will never use both cameras so I had to return one) and reasons behind my decision.
I am not a professional photographer by which i mean i do not derive my income from photography. I am however in imaging industry and have educational (postgraduate) background in digital imaging. I am used to seeing images as a part of my daily job and can easily identify technical aspects. For evaluating these 2 cameras I compared Raw and processed images (using my usual processing routine) in my monitor. I also made 4 sets of prints at 18x24 which was the maximum size prints I ever made and is available to me.
Ergonomics
This totally depends on personal preferences. As I mentioned I am used to canon and I liked the ergonomics in canon 5D2. This is similar to my 40D and very intuitive if you are used to canon. The basic difference I noted was that Nikon had numerous knobs/buttons for controls of various parameters of the camera whereas in canon the scroll wheel was more used. I never found that either camera had serious limitation as far as ergonomics are concerned.
Camera settings
Both cameras offer extensive customization options.
The D700 is more flexible with more options considering 4 different settings of your choice and my menu option. You can also name your settings ( example Raw with auto ISO with flash compensation versus Jpeg with low ISO) and this becomes handy for changing parameters easily. My menu options can be used for settings that you change frequently for your style of photography.
You can also customise the Fn and Dof Preview button, if needed, for any function. (If the function you need is not in the list of options, example autoiso, set the autoiso as the first setting in my menu and assign the first "my menu" setting to FN button, very neat).
The 5D2 also has custom settings that you can register to Mode dial C1,2 or 3. My menu is similar. Both have Info button for quick review of current camera parameters.
Both cameras have auto ISO. The D700 is better (implemented) since you can set the minimum ISO, maximum ISO and minimum shutter speed. In 5D2 you can set ISO 100-3200 but not shutter speed. In my use I set auto ISO between 100/200-1600. But the additional shutter speed option in D700 was very useful for me.
I rarely use mirror lock up and if I use it I prefer it to be available with self timer. This option (MLU with self timer) is not available in either camera. But it is available as a custom function in canon and as one of the shooting modes in command dial in D700.
Flash
I prefer a pop-up flash for informal photos at my home. The D700 flash can be used as remote flash trigger. I never used it in this fashion.
1080P Video
Well this is the biggie. The 5D2 has it and D700 does not. I will deal with this later but if this is important to you then you already know that 5D2 is the choice for you.
Autofocus of Nikon D700 vs canon 5D Mark II (5D2)
This another important differentiator between these 2 cameras. But this is also the most complex differentiators. I will explain. Autofocus of these cameras differ in various modes and it differs also based on the available light.
The D700 has numerous options for AF and numerous customization. These can be accessed using dedicated knobs/buttons or in the custom functions. The customization in 5d2 is rudimentary at best.
Let me go through the major AF modes and discuss the handling of these 2 cameras in each mode.
Single shot AF with center point.
If you are a landscape, architecture or portrait/studio photographer who uses center point alone, then this is the most important function for you. In this regard 5D2 is blazing fast. I do not know about the 5D classic but the 5D2 is very fast and very accurate, better than my 40D. The D700 is also extremely fast but 5d2 is very slightly better at this. (yes I tried 9 points, 21 points, 51 points and also 3d options and also AFS lenses but 5D2 is still a tad, just a tad faster).
Single shot AF with center point in extreme (key word extreme, -1 EV or lower) low light.
Here the situation changes a bit, now 5D2 is a tad slower. The 5D2 hunted a bit and rarely did not focus while the D700 managed to achieve focus.
Single Shot AF with off-center focusing point.
Well this mode is severely limited in 5d2 since it has fewer points, poorly placed and not cross type. D700 is way better and if this (off-center focus or focus/recompose) most important for you, D700 is the better option for you.
AI servo single shot.
Here the 5d2 was better than I expected. It was way better at holding focus and in its accuracy compared to 40D. But D700 is better at this and noticeably so.
AI servo Multiple shots.
This is important in sports, action or event photography. Well D700 is totally in a different league compared to 5d2. The D700 is extremely accurate and well beyond the 5D2 in this regard. Yes you can shoot sports with 5D2 using wide angle or stand lens where the center focus is easy to maintain but otherwise this is the soft spot of 5d2 functionality.
Frames/sec.
D700 is obviously better especially since I had my battery grip the comparison was easily noticed, 3.9 vs 8 fps.
ISO:
I set both cameras to shoot raw and used NR reduction in Raw and post processing before comparing because this is what I do in real world use. First off the 5d2 that I used had a discrepancy with D700 in that 5D2 was always 1/3 to 1/4 of stop lower than the D700 based on shutter speeds set by the camera. What I mean is ISO 3200 in 5D2 is actually 2000 or so. So when I take this into account there is a 2/3rd to 1 stop advantage to D700 but compared directly with just looking at the in camera ISO D700 has a 1/2 stop advantage. I did not downsize the images in the monitor. But actual prints also showed this advantage especially at high ISO. Moreover the D700 noise is mostly luminous noise that I found easy to remove but the 5D2 had a lot of chroma noise that was more difficult to remove.
Sraw showed them to be more or less equal. So if you just compared 5D2 sraw versus D700 raw then mostly they the same. For some reason the sraw images had a blue/greenish tinge and I had to correct the temp in raw correction for all images.
Other Features
D700 has features like multiple exposure, intervelometer. If any of these are important to you then D700 has them but you have to buy accessories to have them in 5D2.
I did not use live view in either except for AF microadjustment.
Image quality
This is the most parameter for any camera. First off both of these are very good cameras with excellent IQ and differences are miniscule at best.
Well I am going to be very abstract with this. I have already mentioned that in the last few years I shot Canon. I have seen a lot of images from cameras by other manufacturers. One thing I have noticed is that certain Canon Raw images (It is not apparent in all images but the occasional ones where the light, angle or something is optimal) have a magical look, sort of dimensional. That look is there with the 5D2. If you know what I mean and if you have experienced this, you will understand. I could never duplicate that look with the D700.
That aside, comparing prints (at 18x24), I could not see a significant difference between the two cameras. I showed them to some friends and neither could they say which print was from which camera. I did notice a slight increased resolution in one image, which showed some intricate woodwork , when I viewed it very closely. But I was looking too close and trying to see a difference. This was a bit of surprise considering a significant difference in mega pixels between the 2 cameras. I also printed some 8x10s, no difference. May be larger sizes (larger than 18x24) may show some difference but I am not concerned and so i did not try it.
Black Dot
Sorry in my use and the kind of pictures I took, I did not experience this. I did not take the kind of pictures which shows this peculiarity.
Weather Sealing
I did not include this in my original blog so I have added a new update as a separate blog "http://prakashphotography.blogspot.com/2009/02/nikon-d700-vs-canon-5d-mk-ii-weather.html"
My Choice
I made my choice based on the current price and my needs. It should not affect your decision or a decision at some point in time in future. No camera is perfect. Every camera is a compromise and you choose the best that suit your needs.
I chose to keep the D700 and return the 5D2. (Check out on my best walk around lens for Nikon D700). (Check my impression on the Nikon 70-300mm VR AF-S here)
My first consideration was price. I was getting the D700 with 2 lenses and battery grip ( with MS live cash back) for the same price as 5D2 body only.
I love the AF features of D700 and got shots of kids that I would have definitely missed with the 5D2. (For in depth explanation of various Auto focus settings and custom modes in auto focus for users of Nikon D700 D3 and D300 please see http://prakashphotography.blogspot.com/2008/12/nikon-d700d3d300-autofocus-settings.html)
I rarely print larger than the size mentioned above so image quality was not different for me. I miss the canon look which I mentioned but as I said you have to make some compromise.
Video is something I looked forward to but was not impressed. With the mirror black out and having to adjust focus on live view and having to use a tripod for most part, I was not impressed. The advantage of 5D2 over a HD camcorder is the shallow depth of field and low light images. I am going to pass this feature right now.
I felt that D700 was more like an all round camera while the 5D2 focused on wedding and studio/still life photographers.
Your choice/mileage may vary, I very well understand.
Subscribe to:
Posts (Atom)

